This post is for beginners to deploy a test OpenStack instance and learn how to deploy cloud instances (virtual machines) with it. I decided to install a test OpenStack instance running on my old laptop and if possible create a booking page that lets users request access to this OpenStack setup via Horizon or SSH. I ended up creating this page for booking it : (Link deprecated), and I created a separate URL for accessing OpenStack.
Installing the Operating System:
Which Operating System do you need? I setup both DevStack and RDO (RPM Distribution of OpenStack). These are two popular free OpenStack distributions. At the time of writing this, Ubuntu 16.04 is great for setting up DevStack. It is geared towards OpenStack developers having an environment to develop and test. However, after having installed the latest release of DevStack, I decided to try out RDO. RDO is deployed using Packstack which is a tool that uses Puppet, an open source configuration management tool, to deploy the various components that make up OpenStack.
As of writing this, DevStack's latest package sets up OpenStack Pike (which can be confirmed from the nova version — 16.0.0) while the latest stable release of RDO contained OpenStack Ocata.
To setup RDO, CentOS works great, however Fedora may work as well. CentOS is a free Linux distribution based on RedHat Enterprise Linux. The version I installed was the latest minimal version of the server pulled from here: https://www.centos.org/download/. I got the Everything ISOversion of the installer which has the option to setup the Minimal version.
Setup OpenStack using PackStack:
It's best to disable Firewalld and NetworkManager.RDO recommends that in their installation website: https://www.rdoproject.org/install/quickstart/
Here are some of the steps I had to perform:
sudo systemctl disable firewalld

sudo systemctl stop firewalld

sudo systemctl disable NetworkManager

sudo systemctl stop NetworkManager

sudo systemctl enable network

sudo systemctl start network
Initial configuration for the wireless port:
My laptop has a wireless port, and I didn't want to physically plug the Ethernet port for convenience reasons. This presents a new problem. Packstack setup recommends that you have NetworkManager disabled on the Operating System. This means DHCP is out of the question. It's also not recommended to have DHCP on the port while running OpenStack. I initially solved this using a specific IP address corresponding to the MAC address of my wireless port. In a way, it's static, but it's still using DHCP to set the same IP address to my wireless port every time. So, I started experimenting with several static IP configurations on my wireless port. Eventually, I was able to figure out that I had to authenticate to my wireless router manually.
To do this, I generated a Hex Code for my SSID and password combination. To do that, use any free WPA PSK generator. Then, I created a wpa_supplicant configuration file called wpa_supplicant.conf with the following information.
network={

ssid=Your_SSID

psk=your_64_character_PSK

}
Then use the following command to authenticate to the wireless router:
wpa_supplicant -B -D wext -i wlp4s0 -c /etc/wpa_supplicant/wpa_supplicant.conf;dhclient wlp4s044
As you may have guessed, wlp4s0 is my wireless port. Now, I had to make this persistent on boot, so add the line above to the /etc/rc.d/rc.local file and set the right permissions for this file: chmod +x /etc/rc.d/rc.local.
At this stage, it's best to reboot your laptop to make sure you can connect to the Internet through the wireless port.
Continue OpenStack setup using PackStack:
It's not mentioned in the website, but it's better to disable selinux or set it to permissive. It's also recommended to have a fully qualified domain name (FQDN). Ensure you have properly set up the /etc/hosts and the /etc/resolv.conf files.
Then perform the following self-explanatory steps;
yum install -y [https://rdoproject.org/repos/rdo-release.rpm](https://rdoproject.org/repos/rdo-release.rpm)

yum install -y centos-release-openstack-ocata

yum update -y

yum install -y openstack-packstack
In my all-in-one laptop setup, contrary to what's specified in the installation website, it's best to generate an answer file which you can use to fine-tune what you actually set up.
packstack --gen-answer-file=answer.txtThis comes up with a file (called answer.txt) which contains all the parameters regarding the installation of OpenStack. I disabled certain OpenStack components like Swift (the Object Storage service) and telemetry (the metering service) as this is just a test setup on a laptop.
Then I used the following command to run the installation.
packstack --answer-file=answer.txtMy laptop had around 300 GB of disk space, with 4 cores and 8 GB of RAM. The setup completed in about 30 minutes, and you must see a Installation completed successfully message.
It didn't work the first time (Error: systemd start for rabbitmq server failed) and I asked a question on the Ask OpenStack forum. It hasn't been answered by the time of this blog post, but I solved it by adding a search keyword with my domain name on my /etc/resolv.conf file and by adding my internal IP (wireless port's IP) and my domain name in the /etc/hosts file. I will explain how to generate this domain name later. One thing to note is the way you know the installation didn't succeed is by not getting the Installation completed successfullymessage. You will still be able to access the Horizon dashboard but several things that have to do with the RabbitMQ server will not work.
Configure Neutron:
Once the installation is done, OpenStack sets up several virtual bridges, one for the internal network (your private home network) , one for the external network (the public network) and one as a tunnel. Here's a screenshot to better explain this;
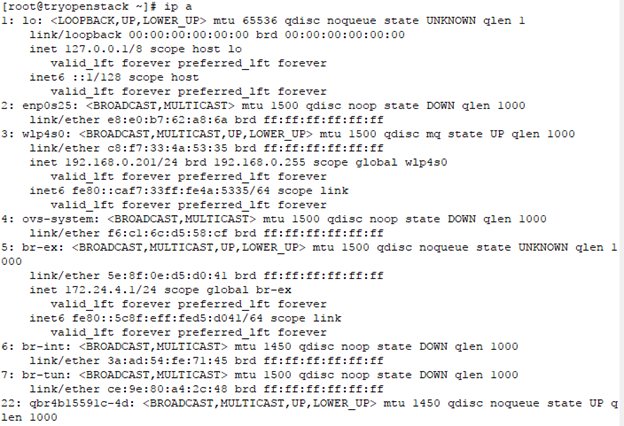
Image 1. Virtual bridges
There are a couple of ways to handle this. The first one, the recommended I'd assume, is to setup the br-exinterface to have the IP address that was in the wlp4s0interface, and the make the wlp4s0 port, a port in the OVS bridge. If this configuration is needed for someone, I'll post it here — but for the sake of brevity let me ignore this for now. In short, the wireless interface configuration would change to something like this;
NAME=My_SSID

ESSID=My_SSID

ONBOOT=yes

IPV6INIT=no

BOOTPROTO=none

DEVICETYPE=ovs

TYPE=OVSPort

OVS_BRIDGE=br-ex
The second way, is to use the default network configured by OpenStack on the external bridge 172.24.4.0/24 as shown in the screenshot above. This network, as it's a bridge, can still route traffic via the wireless port to the Internet by default, and the instances that you may deploy will have connectivity to the Internet — sort of like a tunnel (I have proof of this below). However, you would not have the ability to ping the deployed instances from your local wireless network laptops.
Configure Horizon:
Once the installation is done, you can simply point your browser to your static IP address that you configured for the laptop, and you should be able to see the OpenStack dashboard. One of the good things I was surprised by, was a materialtheme for the OpenStack interface — inspired by Google's material design — if you're familiar with Android development.
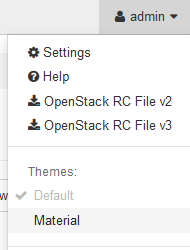
Image 2. Material theme
I had a Cirros instance stuck in the queuedstate, and I was able to get rid of it (only) from the CLI, using the following command;
glance image-delete image_ID;This may have been because of the first failed message I received, as mentioned above.
The rest of the setup is very important. Next, you setup Neutron. I briefly mentioned which internal and external network I setup above. I can provide more details if anyone needs this. Then setup a virtual router to bridge the internal and the external networks using one gateway address. This is a screenshot of the topology from the second wayI mentioned above.
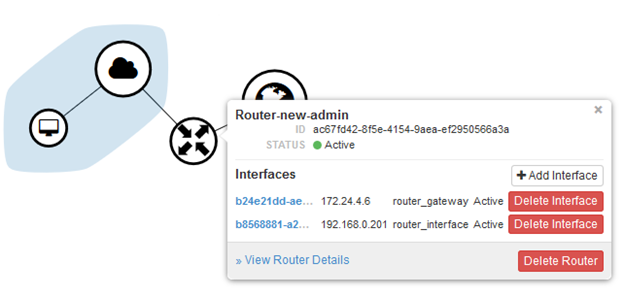
Image 1. Virtual router in your cloud
Then, it's best to setup your key pairs. You have to copy your public key on the Key Pairs section on Horizon. Most cloud instances need key pairs for authentication and your regular username/password method of authentication will not work.
Then, setup an image — several Cloud-init enabled images are available on the Internet, that you can either download and upload to Horizon, or directly import via a URL. I decided to stick with the Cirros image — just for initial testing.
Horizon in the Ocata release has revamped the instance launching screen. It looks much better and is intuitive.
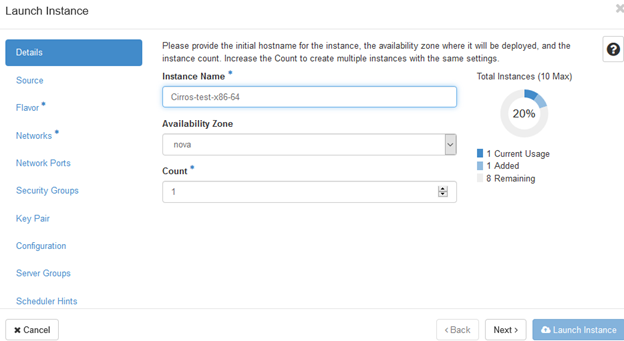
Image 1. Instance launching screen
To cut the long story short, I deployed my first instance and it was successful. I also associated a floating IP on the test 172.24.4.0 network. The wireless port acted as the gateway for the internal network — 192.168.0.0 network.
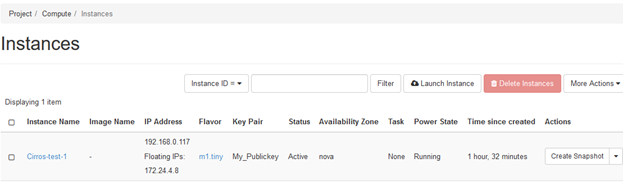
Image 5. First test virtual machine
The instance is able to ping google.com in spite of it not showing up on my wireless router as a registered host.
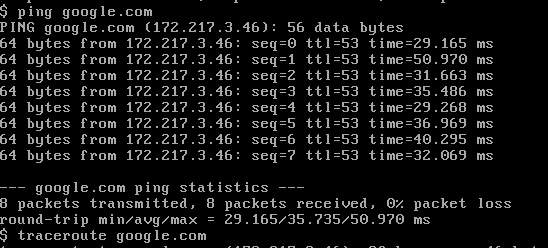
Image 6. Pinging the public network from within your private cloud
Setup a domain:
This step is quite important, and should be at the top of this page, as this was one of the first things I did. My cheap wireless router had a feature of creating DDNS addresses associated with the public IP (which may change on router reboot) provided by my ISP. So, I generated a URL for my public IP address and opened up the HTTP port (80) on the router. If this URL doesn't work, it's because I've shut down my laptop.
URL: Link withdrawn
However I wanted an always-on URL to enable people to bookmy OpenStack instance. This URL is here: Link withdrawn
The idea is if you send me a request via this URL (Link withdrawn) I'd be able to open my laptop, create a project, and user for you and let you access the resources. I also set up a booking page to charge for resources via Paypal.
Here's a diagram I came up in a short time to explain the whole thing:
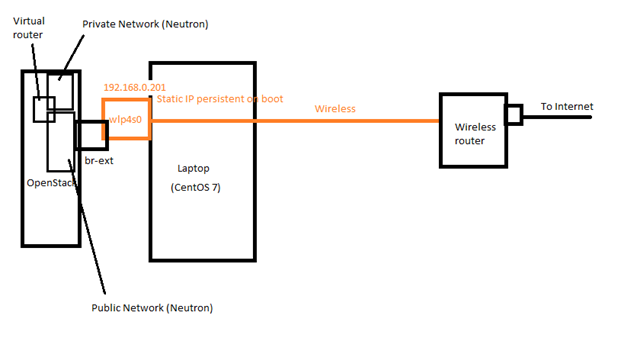 Image 7. A quick diagram I drew on MS Paint
I wrote the whole thing in about 30 minutes and I apologize for any grammatical errors.
Things to try in the future:
- Convert site to HTTPS, SSL
- Try increasing the SWAP space and figure out if it's possible to use more memory for deployed instances (OpenStack itself takes up about 6 GB of RAM)
- Go back to the first way of Neutron setup — of using the wireless network as internal network for deployed instances, but this would require real floating IP addresses on the Internet for these instances
- Try a multi-node setup
- Implement a similar setup on test instances on a public/private cloud